Map ENOVIAvpm Objects onto 3DEXPERIENCE | ||
| ||
This application generates and posts on the server the mapping files and also generates some CATNls and CATRsc files required for a simple configuration of 3DEXPERIENCE applications. A mnimum configuration is still required on the server side but the XML mapping as well as some CATNls and CATRsc files are generated by the batch.
This application does not implement the entire configuration on the server. It generates:
- the CATRsc files for plmvisibility (enabling the table to be queried)
- the CATRsc and CATNls files for the plmtoolbar
- the CATNls files defining the attribute aliases
- the metadata files (on the server)
- the 3DEXPERIENCE administration file (on the server)
- the xml mapping file (on the server).
The CATNls and CATRsc files can subsequently be modified.
Important:
|
- Launch the following
command:
CATUtil -Name VPMV4ToV6Mapping
- Connect to a 3DEXPERIENCE server.
-
Connect to an ENOVIAvpm server.
The ENOVIAvpm mapping dialog box appears: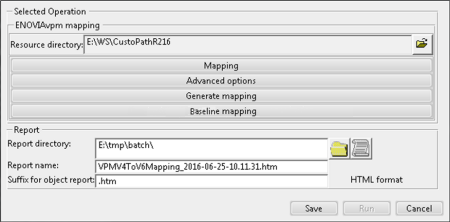
- Click the
 icon to the right of the
Resource directory field to specify where the
CATNls and CATRsc files are to be generated.
- For information on how to use the Advanced options button, see Advanced Options for Attribute Mapping.
- For information on how to use the Generate Mapping button, see Generating Mapping and Business Logic Automatically.
- For information on how to use the Baseline Mapping button, see Customizing Baseline Mapping.
- For information on how to use the Report section at the bottom of the ENOVIAvpm mapping dialog box, see Accessing and Configuring the Attribute Mapping Report.
- Click the
Map button. The
ENOVIAvpm Mapping Tool Object Selection dialog
box appears:
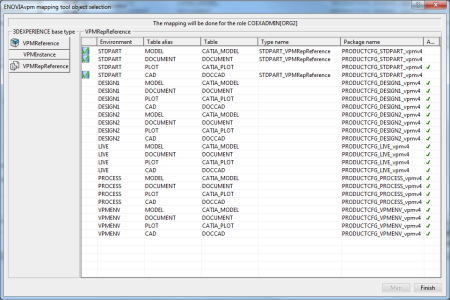
Note the role name at the top, COEXISTENCE[ADMIN] in this particular case.Important: - Each mapping set is related to a particular role.
- If an ENOVIAvpm environment is not mapped, it will be non-existent in 3DEXPERIENCE.
- You cannot change the table alias because it is defined by VPM.
- You cannot change the customization name either.
- In the top left-hand part of
the dialog box, select the parent type from the list showing the supported
PRODUCT modeler types:
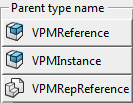
In the main section, you can see the objects available for the selected parent type. Let's look closer at the contents of this dialog box: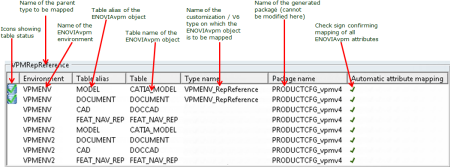
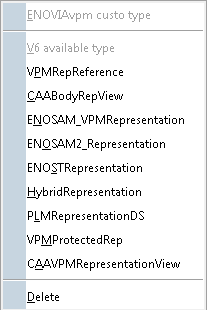
- If you want to change one of the type names, double-click it in the Type name column and enter the name of another type.
- Alternatively, right-click
the type name you want to change and check the appropriate type in the
contextual menu that appears. Note that a delete option will also appear at the
end of this list.
Important: - Be careful not to
rename a type that you have already mapped in the current session. Otherwise,
you will lose the mapping you have just done. If you attempt to rename the
type, you will receive the following warning:
This object is already mapped. You must first delete it before changing the name.
- When you select a 3DEXPERIENCE type, the customization name changes to the name of the corresponding 3DEXPERIENCE metadata.
- Be careful not to
rename a type that you have already mapped in the current session. Otherwise,
you will lose the mapping you have just done. If you attempt to rename the
type, you will receive the following warning:
- In the Automatic attribute mapping column, the check sign appears by default to confirm the mapping of all ENOVIAvpm attributes. This is only possible if the type name is not a 3DEXPERIENCE type. You can uncheck a row in this column if you wish.
- Select the appropriate rows
containing the different tables. The icons to the far left of the list help you
do this by showing the status of each table:
As you can see in the example shown above, the tables CATIA_MODEL and DOCUMENT have already been mapped. If you select one of them, the icon will change from
The table has not previously been mapped. You have not selected it to be mapped now. 
The table has previously been mapped. You have not selected it to be remapped. 
The table has not previously been mapped. You have selected it to be mapped now. 
The table has previously been mapped. You have selected it to be remapped. 
You have started mapping this table in this session. The mapping has not yet been saved.  to
to
 indicating your choice to remap
them.
In the same example, the other tables have never been mapped. If you select either one of them, the icon will change from
 to
to
 indicating your choice to map
them. You can revert to the original icon by simply reselecting the row.
- Select
Map. The
ENOVIAvpm to 3DEXPERIENCE mapping interface
appears:
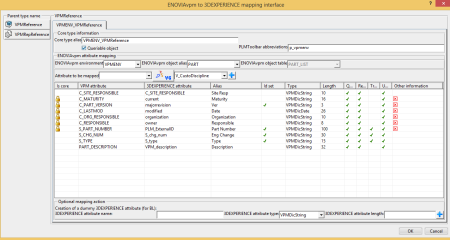
- Select the parent type from
the list showing the supported PRODUCT modeler types:

- In the
3DEXPERIENCE core type information section, you
can:
- modify the 3DEXPERIENCE core alias in the Core type alias field.
- complete the PLMToolbar abbreviations field if necessary.
- leave checked or uncheck the Queriable object check box (checked by default). This box indicates that the object is queryable using the Advanced Search.
- In the
ENOVIAvpm attribute mapping section, you can
make a selection in the
ENOVIAvpm object alias field if the list
contains more than one object:

This is the alias of the table you are in the process of mapping. The name of this table is indicated in the grayed out ENOVIAvpm object table field to the right and cannot be modified since you selected it earlier in the ENOVIAvpm Mapping Tool Object Selection dialog box. - In the lower half of the
ENOVIAvpm to 3DEXPERIENCE mapping interface
dialog box, you can see a mapping list. This is only an example and must
normally be changed to suit your requirements. In the
Attribute to be mapped section just above the
list, do as follows:
- EITHER
map an ENOVIAvpm attribute on an existing 3DEXPERIENCE attribute:
by opening the combo box on the left and selecting one of the ENOVIAvpm attributes:
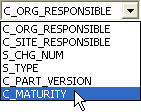
then, with the button displayed, selecting a
3DEXPERIENCE
attribute from the combo box on the right:
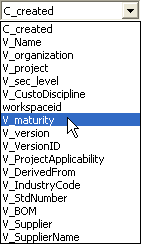
then selecting to add the mapped attribute to
the list below.
OR
create a customized ENOVIAvpm attribute in the 3DEXPERIENCE model:
by opening the combo box on the left and selecting one of the ENOVIAvpm attributes:
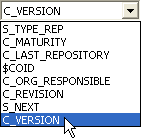
then, with the button displayed, selecting
 to add the customized attribute
to the list below.
Important: - Before adding an
attribute to the table, make sure that you do not mistake the
 button, used for straightforward
mapping on a
3DEXPERIENCE
attribute, for the
 button, which grays out the
3DEXPERIENCE
attribute list and is used for creating customized attributes. These two
buttons are in fact a toggle. You click one to display the other.
- ENOVIAvpm
attributes that have been mapped to an existing
3DEXPERIENCE
core attribute (i.e. non-customized) are identified in the table by the
 symbol in the
Is core column.
- Customized 3DEXPERIENCE attributes are automatically renamed in the attribute table below. The new 3DEXPERIENCE name is the ENOVIAvpm name preceded by the ENOVIAvpm object table name. For example, the ENOVIAvpm attribute C_VERSION is renamed VPMENV_CATIA_MODEL_C_VERSION. You can of course rename a customized attribute manually in the table.
- Customized
3DEXPERIENCE
attributes are identified in the table by the
 symbol in the
Other information column. The
 symbol indicates that no
additional information is available.
- Both the type and length of the selected ENOVIAvpm and 3DEXPERIENCE attributes should be compatible. Attribute compatibility is checked when you add a new attribute or reset one.
- Before adding an
attribute to the table, make sure that you do not mistake the
- select then right-click
the
VPM attribute column to either reset your
selection or to delete from the list the ENOVIAvpm attribute in the row you
selected:
or select then right-click the 3DEXPERIENCE attribute column to delete a 3DEXPERIENCE attribute from the list using the option Remove 3DEXPERIENCE attribute. - double-click a 3DEXPERIENCE alias in the Alias column to change the default name i.e. the name of the ENOVIAvpm alias
- double-click a customized attribute in the 3DEXPERIENCE attribute column to change the name that was automatically chosen when you created the attribute
- check
 or leave unchecked the
Id set column
Important: - All the attributes from the ENOVIAvpm id set have to be mapped. In a representation table, the $COID attribute(s) can also be mapped and belong to the id set but CANNOT be in a mask.
- The 3DEXPERIENCE id set must be comparable to the ENOVIAvpm id set. If, for example, the ENOVIAvpm id set contains three ENOVIAvpm attributes, the minimum contents of the 3DEXPERIENCE id set must consist of these three corresponding attributes.
- check
 or leave unchecked the
Query mask,
Result mask,
Tree mask and
Update mask columns. For an attribute to be
visible in
3DEXPERIENCE,
at least one of these four masks must be selected.
- The query mask is used for the query dialog box.
- The result mask is used for the result list.
- The tree mask is used for the VPM Navigator tree.
- The update mask is used for the Properties dialog box.
- in the row of a
customized ENOVIAvpm attribute, select then right-click the
 symbol in the
Other information column to view the default
values, authorized values or help values you wish to keep in
3DEXPERIENCE:

then select the appropriate value:
Queries can then be made using these values: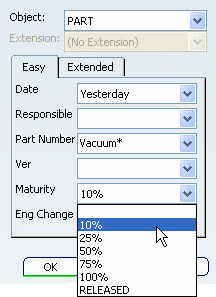
Important: Authorized values (identified by the  symbol) and help values can:
- be supported only
on customized attributes and not on core i.e. mapped attributes (identified by
the
 symbol)
- not be modified or defined in the ENOVIAvpm mapping application.
- be supported only
on customized attributes and not on core i.e. mapped attributes (identified by
the
- EITHER
- You can also create a dummy
attribute, for Business Logic purposes for example, using the
Optional mapping action section at the bottom of
the dialog box:

Enter the attribute name manually in the first field, select the attribute type from the combo box, enter the attribute length in the last field then select to add the attribute to the list
above.
- When you are satisfied with the mapping contents, click OK. The main mapping window will now reappear for each type name that you have not yet mapped. When the type name mapping for the selected environment has been completed, the ENOVIAvpm Mapping Tool Object Selection dialog box will reappear. If you want to map another environment, repeat the procedure described above.
- Otherwise, click Finish. The ENOVIAvpm mapping dialog box shown above reappears.
- Select
Save if you want to launch the mapping operation
later on. The batch parameters are saved in an XML file.
When saved, this file can be edited manually and used later on to run the batch directly without accessing the batch interface. For more information, see "Running a Batch Directly from the Batch Monitor" in the Infrastructure User's Guide.
- If you want to launch the mapping operation now, select Run.
- Once the mapping operation has been completed, you must copy the generated CATNls and CATRsc files into the runtime view of the installation or add them to the environment.
| Important: |
- The ENOVIAvpm mapping application does not configure the server side.
- All ENOVIAvpm attributes must be mapped on a 3DEXPERIENCE attribute. You cannot leave any ENOVIAvpm attributes in an unmapped status because unmapped attributes are not added to the metadata as customized attributes.
- Make sure that you map VPM attributes with similar 3DEXPERIENCE attributes.
- If a representation is selected for mapping and its corresponding reference i.e. the PART_LIST table of the same ENOVIAvpm environment is not mapped, the corresponding reference and instance are added to the list of objects to be mapped.
- If a reference is deleted from the mapping, all the corresponding representations and instances that were mapped are also deleted.
- More than one representation table can be mapped on the same metadata item.
- There must be at least one metadata item for each ENOVIAvpm environment.
- In a single 3DEXPERIENCE metadata item, two ENOVIAvpm attributes with the same alias cannot be mapped on two different 3DEXPERIENCE attributes. For example, if two ENOVIAvpm representation tables are mapped on the same metadata and if two attributes from these tables have the same alias, they have to be mapped on the same 3DEXPERIENCE attributes.
- 3DEXPERIENCE attribute must be compatible with the corresponding ENOVIAvpm attributes. For example, if the 3DEXPERIENCE attribute is an integer you cannot map a string on it. However, if the 3DEXPERIENCE attribute is a string you can map an integer on it. STRING 10 can be mapped to STRING 20, etc. Particular attention must be paid to such compatibility in a ENOVIAvpm > 3DEXPERIENCE / 3DEXPERIENCE > ENOVIAvpm context.
- 3DEXPERIENCE attributes must be mapped and have a non-null value.
- The identifier set of a ENOVIAvpm table must correspond to a 3DEXPERIENCE id set.
- To include ENOVIAvpm attributes of $EXT/VPMInstance mapped as 3DEXPERIENCE attributes for migration purposes, the
parameter:
isInstanceMapped="true"
must be manually added to the VPMInstance definition in the mapping file.