Manage Projects and Subprojects
For the project node, there is a line behind the milestone icons that extends from the
start to the end of the project. The line is automatically calculated using the start and
end dates of all milestones, tasks, and subprojects under the project.
In the tree pane or the scheduling pane, click  or or  to
expand or hide elements in a project or subproject. to
expand or hide elements in a project or subproject.
Right-click a project or click  for these options: Open (disabled for the
root project), Edit, Copy Link (copies the
project link to the clipboard), and Delete or
Remove for a contributing project. for these options: Open (disabled for the
root project), Edit, Copy Link (copies the
project link to the clipboard), and Delete or
Remove for a contributing project. Note:
Deleting a project only
deletes the selected project and its tasks and milestones. Any child projects are not
deleted.
Drag a project (P1) that has a parent and drop it on to a different project (P2).
Double-click a subproject to change its properties. See Projects.
Manage Tasks
Right-click a task or task bar, or click  for these options: Edit, Assign
to Self, Pin/Unpin, and Delete. for these options: Edit, Assign
to Self, Pin/Unpin, and Delete.
Double-click a task bar to see its properties and make constraints. See Tasks and Managing Constraints.
Blue  indicates an
on-time task with no compression. Compression takes into account the +/- margin on the
task's duration. indicates an
on-time task with no compression. Compression takes into account the +/- margin on the
task's duration.
Orange  with one
chevron indicates a compressed task, one having its planned duration in the lower range of
the duration interval. For example, a task is compressed if it has an estimated duration of
10 days, +- 4 days, and a planned duration of 8 to 10 days. with one
chevron indicates a compressed task, one having its planned duration in the lower range of
the duration interval. For example, a task is compressed if it has an estimated duration of
10 days, +- 4 days, and a planned duration of 8 to 10 days.
Orange  with
2 chevrons indicates a highly compressed task, one having its planned duration in the higher
range of the duration interval. For example, a task is highly compressed if it has an
estimated duration of 10 days, +- 4 days, and a planned duration of 6 to 8 days. with
2 chevrons indicates a highly compressed task, one having its planned duration in the higher
range of the duration interval. For example, a task is highly compressed if it has an
estimated duration of 10 days, +- 4 days, and a planned duration of 6 to 8 days.
You can drag a WeDo task from SwYm or from global search to the schedule in Project Planning.
You can drag a Project Planning, standalone, WeDo, or Lean task from the task board in
the Collaborative Tasks
app.
If a task has one or more assignees, a profile picture of an assignee is displayed by the
task name. If you hover over the profile picture, the full name of the user displays. If
there is more than one assignee, the number of additional assignees are displayed next to
the first assignee's image. If you hover over the "+X" string, full names of the additional
assignees are displayed.
You can drag tasks between projects. For example:
- Drag a task that has a parent and drop it on a different project.
- Drag a task that has a parent and drop it in between sibling tasks of a different
project.
Single-click a task to see a pop-up tooltip showing the description along with the planned
start and end dates.
Create a Task in the Schedule
You can add a task with its basic information. For an enterprise project only, first
click the project or the task under which you want to create the task or subtask. To
add a task, click  and choose
Task. and choose
Task. Enter the task details: Note:
You can add more task attributes when you open the task and view its
properties. See Edit a Task.
Create and Show Schedule Highlights
Highlights are a way of filtering tasks that you have selected for special attention.
Highlights display in the Schedule Highlights view that appears above the schedule and are
available only for enterprise projects. You can select leaf tasks and subproject
tasks. 
To select a task
as a highlight, right-click its task bar in the regular schedule and click Add to
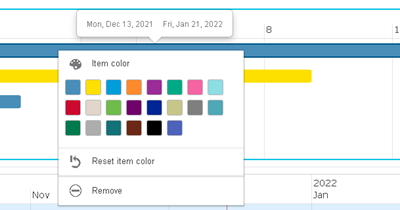
Schedule Highlights. To color a task bar for a highlight task,
right-click the task bar and click a color. 
There are
options to Reset item color and Remove the
task from the Schedule Highlights view. Removing it as a highlight does not remove the task
itself that displays in the schedule. To see a task's start and end dates, click the
task bar. To turn on/off the Schedule Highlights view, click  and then click
Schedule Highlights. and then click
Schedule Highlights. Schedule Highlights also display in the
Summary tab. For more information, see Summary.
| ![]() or
or ![]() to
expand or hide elements in a project or subproject.
to
expand or hide elements in a project or subproject.![]() for these options: Open (disabled for the
root project), Edit, Copy Link (copies the
project link to the clipboard), and Delete or
Remove for a contributing project.
for these options: Open (disabled for the
root project), Edit, Copy Link (copies the
project link to the clipboard), and Delete or
Remove for a contributing project. and then drag.

